Scene Configuration
Radar Model
The framework provides the radar sensor in Unity3D as a prefab model which can directly be imported and is linked to the radar scripts. The prefab model is found in the Prefab folder and is named MainCam. In the following, we elaborate the most important settings of the radar sensor prefab.
Optionselection. Allows to transmit radar data either via ROS as a rostopic or directly via TCP/IP (e.g. for Matlab, Python, …)
Fov. Defines the field-of-view of the radar sensor in degrees.
Chirps. Defines the number of chirps of the radar signal
Samples. Defines the number of samples per radar chirp
Antennas. Defines the number of receiver antennas of the radar sensor.
Sampling Frequency. Defines the sampling frequency of the radar sensor in hertz.
Lower Frequency. Defines the lower chirp frequency of the radar sensor in hertz.
Bandwidth. Defines the bandwidth of the radar chirp in hertz.
Radiation Pattern Mask. Defines a radiation pattern mask of the radar. Chose None if not needed.
Parameters (6)-(8) are important for correct radar operation and are often obtained in the datasheets of FMCW radar sensors.
Setting up ROS connection
To correctly set up the ROS connection to the Unity3D environment, the rosbridge package is mandatory and should be compiled in your ROS workspace.
In Unity3D, do the following
Create a new GameObject
To the created GameObject, add the Ros Connector script which interfaces to rosbridge.
The ROS connector needs to be configured to the rosbridge server IP address which should be configured in the field Ros Bridge Server Url
Add the Float Array Publisher script to the GameObject and assign a topic name, e.g. radar_data
Map the GameObject to the radar sensor, i.e. in the prefab model assign the GameObject to the RosConnector field.
Launch the rosbridge server using roslaunch rosbridge_server rosbridge_websocket.launch
Run the simulation. The raw data stream should now be available as a rostopic.
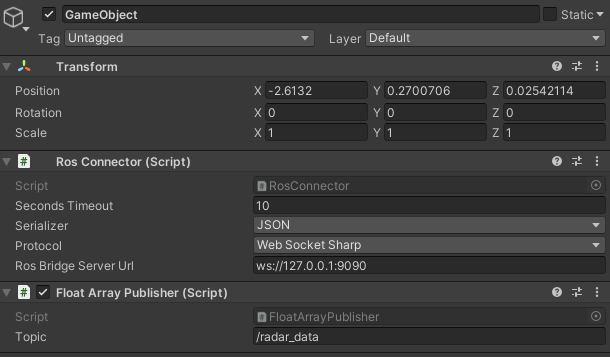
Figure 1. Settings to be modified in the RosConnector GameObject.
Material Properties
The framework is capable of simulation wave penetration effects of non-conductive materials. To achieve this, a multi z-buffer approach was implemented in Unity, to account for penetration through objects executed in a non-conductive rendering pipeline.
To assign an object to the non-conductive rendering pipeline do the following:
Assign a material to the object. You can either use a pre-defined material of the Materials folder or download/create your own one.
Once assigned, chose the Standard Shader option and chose Transparent in the Rendering Mode tab.